Who doesn’t love a good cake smash pic? Since Carter’s birthday party was after her actual birthday, I decided to do a cake smash and document it via a million pictures to celebrate her actual first birthday.
My sister and I both have DSLRs – we aren’t professional photographers but we can use the camera in semi-manual modes so I figured we could pull it off. After reading a few blog posts of other mamas who did their own DIY cake smash shoot, I was confident that this was going to go great. Plus I had a super cute subject (admittedly biased opinion). Turns out, I was right – I love it when that happens. The cake smash photo shoot was a huge success. Here’s how we pulled it off.
Materials Needed:
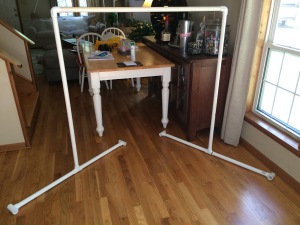
- PVC Frame (super easy to put together….literally anyone could do it, in our case, Blake was in charge of this part)
- A roll of seamless paper (can be found at arts and crafts stores) – we shopped locally and got one at Not Just Paper
- Some decoration.. you could use balloons, streamers, confetti, toys…anything to add some color and fun
- A great outfit. This isn’t required but it’s a plus. We got Carter’s outfit here. We were a little worried she would boycott the headband since she doesn’t normally wear head pieces, but once we shoved cake in front of her she was oblivious to anything else
- A Cake. Suzie Q made ours
- A decent camera. I own a Nikon 3200 and my sister has a Canon that is similar
First Blake built the frame and then I did the general scene prep. We set the scene in our kitchen area where our kitchen table usually sits because we get a lot of natural light there from the widows to the right and from the sliding doors that go to the deck.
Next we placed the cake.
I read that some kids don’t love cake or don’t dig in right away so I was prepared for that… but… Carter is a natural and dug right in. I think she was a little skeptical at first, but as soon as that sweet sugar hit her lips, she was all in!
Here’s are some of the pics we captured:

This is when things got serious. She wasn’t messing around. This is when she mentally committed to eating the entire cake.

Cousin Ben wanted in on the action. He knows the joy of cake smashes and is legitimately happy for Carter. Clapping even.
Obviously, hiring a professional photographer to do your cake smash photo shoot will ensure great pics. But, don’t be afraid to try it on your own! It will save a little money and you will have so much fun! (This entire DIY cost us about $50).
A few more camera details: my sister used a 35mm lens with a lower aperture setting and I used the stock lens my camera came with…honestly I don’t remember the settings I used (which is one of the many reasons why I’m a professional).
To close out here are my Top 5 Tips for pulling off your own cake smash photo shoot:
- Take a ton (like more than 100 pictures). A lot of them ended up blurry but the key is to just keep snapping pics. The more you take the better chances of getting a good one.
- Make sure you have good, natural lighting. As I’ve said before, I don’t know a lot about photography but I know lighting is key.
- Be prepared for a mess. Know that everything is going to get cake on it. Be ok with that.
- Get some help. Get the rest of the family involved – if you’re behind the camera, it helps to have someone to place the kid in front of the cake and redirect them back to the cake when they can no longer focus due to sugar overload.
- HAVE FUN/ DO NO STRESS – this is fun. Make it fun. Your kid is eating cake, you’re watching. Relax and take it in… if you’re doing this for your kid’s first birthday you should have some cake too. You survived the first year which means you’re a super hero and awesome… pop open a bottle of champagne while you’re at it… or maybe wait until after the shoot.


